Android
The easiest way to create a PreEmptive Protection™ DashO™ for Android & Java project for your Android application or library is to use the New Project Wizard. We recommended you integrate DashO into your existing Gradle project. However, if you only have the APK file, DashO can process it directly in some cases.
Integrate into a Gradle Project (Recommended)
We recommend you use the wizard to integrate your project. If you want to see what the wizard changes or just integrate manually, please see below.
Prerequisites
- Android Gradle Plugin v3.2.0 or later
Integrate DashO via the Wizard
The wizard examines your build environment to integrate the new DashO Gradle Plugin for Android into the build process. It will not overwrite any of your source files. Start the wizard by going to File > Project Wizard. Select Android (Most projects). The wizard will ask you for the location of the Android project.

Select the directory containing the project (or appropriate module) and click Next.
Then, click Finish to allow the wizard to modify the Gradle configuration and create project.dox.
If project.dox exists, the wizard will ask if you want to replace it.
If you choose to save over the existing project, your new settings will be saved, and a backup of the old file will be created.
The DashO GUI will then load the project and you may be prompted to build (e.g. gradlew assembleRelease).
Once the build is complete, you can reload the project's classes by going to Project > Reload Class List.
Note: You may also need to Enable R8.
Congratulations! Your application or library is now protected by DashO!
See DashO Troubleshooting and the DashO Gradle Plugin for Android Troubleshooting if you encounter any issues during the build.
You can enhance your protection as described below.
Integrate DashO Manually
The wizard makes a few changes to your Gradle build configuration which can also be done manually:
- Add the PreEmptive Solutions Maven Repository to your buildscript repositories, in your root
build.gradle:buildscript { repositories { maven { url 'https://maven.preemptive.com' } //add this line } } - Add the plugin's artifact to your buildscript dependencies:
buildscript { dependencies { classpath 'com.preemptive.dasho:dasho-android:1.0.+' //add this line } } - Apply the plugin after the Android Gradle Plugin was applied:
 apply plugin: 'com.android.application' //could also be `com.android.library`
 apply plugin: 'com.preemptive.dasho.android' //add this line
Ensure that you have
minifyEnabledset totruefor thereleasebuild(s), to allow renaming and shrinking:android { buildTypes { release { minifyEnabled true } } }Note: You may also need to Enable R8.
Set DashO Home. This is not needed if DashO is installed in the the standard location. Note that there are multiple ways to configure DashO Home.
If this is an Android Library (AAR) project, you should add rules to your R8 configuration to preserve the public API of the library.
Create a file named
library-rules.proin your project directory with the following contents:-keep public class * { public protected *; } -keepparameternames -renamesourcefileattribute SourceFile -keepattributes Exceptions,InnerClasses,Signature,Deprecated, SourceFile,LineNumberTable,*Annotation*,EnclosingMethodConfigure R8 to use those rules by adding or updating the
proguardFilesline inbuild.gradle:android { buildTypes { release { proguardFiles getDefaultProguardFile('proguard-android.txt'), 'library-rules.pro' } } }
Generate a default Android Mode configuration file,
project.dox, in the directory containing your application's or library'sbuild.gradlefile. Assemble your project with theGENERATE_DASHO_CONFIGproperty defined:gradlew clean assembleRelease -DGENERATE_DASHO_CONFIG- Ignore the
.dashodirectory in your source control system (e.g. add.dasho/to the.gitignorefile).
Congratulations! Your application or library is now protected by DashO!
See DashO Troubleshooting and the DashO Gradle Plugin for Android Troubleshooting if you encounter any issues during the build.
You can enhance your protection as described below.
The Android Gradle Plugin will automatically generate keep rules to prevent R8 from renaming or removing necessary classes and members, based on your project configuration. If you run into issues, it may be necessary for you to specify additional keep rules. See R8 below about how to configure a rules file.
Enable R8
If you are running version 3.2.x or 3.3.x of the Android Gradle Plugin, add the following to your gradle.properties file:
#Only for Android Gradle Plugin v3.2.x or v3.3.x
android.enableR8=true
Enhance Protection
DashO's default Android Mode protection settings are chosen to give your application reasonably-strong protection without requiring you to perform additional configuration. You can improve upon this by adjusting the DashO configuration and by enabling certain options in R8.
DashO
You can enhance your protection by modifying your project file in the DashO GUI.
In particular, you may want to add Checks to your project. Checks add an additional layer of protection to your application or library, allowing it to resist attempts at debugging, hooking, or tampering. Checks can also prevent your software from running in unsafe environments, including rooted devices and Android emulators.
You may also want to increase the String Encryption Level or increase the number of try/catch blocks injected in Try/Catch Control Flow Obfuscation.
If you would like different protection settings for different build variants you can copy your initial project file with a variant-specific name.
R8
R8 is configured by referencing a rules file in your application's or library's build.gradle.
If you do not already have one these files, you'll need to create an empty one.
This rules file, named migrated-rules.pro in our example, is typically put in the same directory as the build.gradle file.
Reference the file with the following:
android {
    buildTypes {
        release {
            proguardFiles getDefaultProguardFile('proguard-android-optimize.txt'), 'migrated-rules.pro'
        }
    }
}
This line will also enable optimization. When this is enabled, R8 may emit warnings about ignored options, but these warnings can be safely ignored.
The syntax for the R8 rules is described here.
Rename Packages
By default, R8 will rename individual parts of a package name, for example com.preemptive.dasho to m.e.r.
Although the original names are removed, the original package hierarchy is preserved.
This can imply relationships between classes, and could thus theoretically leak information.
Merging these packages together, e.g. renaming all of the classes so that they share the same package, can eliminate that risk.
Add the following to your rules, where com.yourcompany is the package into which all of the classes will be moved:
-repackageclasses com.yourcompany
-allowaccessmodification
This will allow R8 to change the effective access to classes and class members, allowing more classes to be moved to the same package. This option is analogous to DashO's Standard Mode feature Make Public.
Any classes that are determined to be entry points (activities mentioned in the manifest, etc.), and other classes excluded via keep rules will not be moved.
Note: You may not need to specify
-allowaccessmodificationexplicitly, it is included in the rules inproguard-android-optimize.txt(as above).
Post-process an APK
This section will walk you through setting up an existing Android application (APK) project to use PreEmptive Protection DashO for Android & Java. This approach differs significantly from projects that integrate DashO into the Gradle build using the DashO Gradle Plugin for Android: all renaming and removal are handled by DashO, rather than delegating those portions of obfuscation to Android's R8 minifier.
When dealing with the APK, DashO uses the third-party dex2jar and Apktool utilities to extract the classes. DashO then obfuscates the classes, and uses those tools to output a new APK.
Prerequisites
The DashO host must have:
- Android SDK Tools Revision 10 or later
- Java 8, or later, must be on the system path
Notes:
This approach will not work for:
- Multidex APK files.
- Android Libraries (
.aarfiles).Use the Gradle integration if those apply.
DashO will not process embedded APK files (as used by Wear OS). If you have an application which includes a Wear OS application, use the DashO Gradle Plugin for Android if you wish to obfuscate the Wear portion.
Create a DashO Project with the Wizard
The wizard examines your application and determines appropriate settings for protecting it. Start the wizard by going to File > Project Wizard. Select Android (APK post-processing). The wizard will ask you for the location of the APK and about the original build environment.
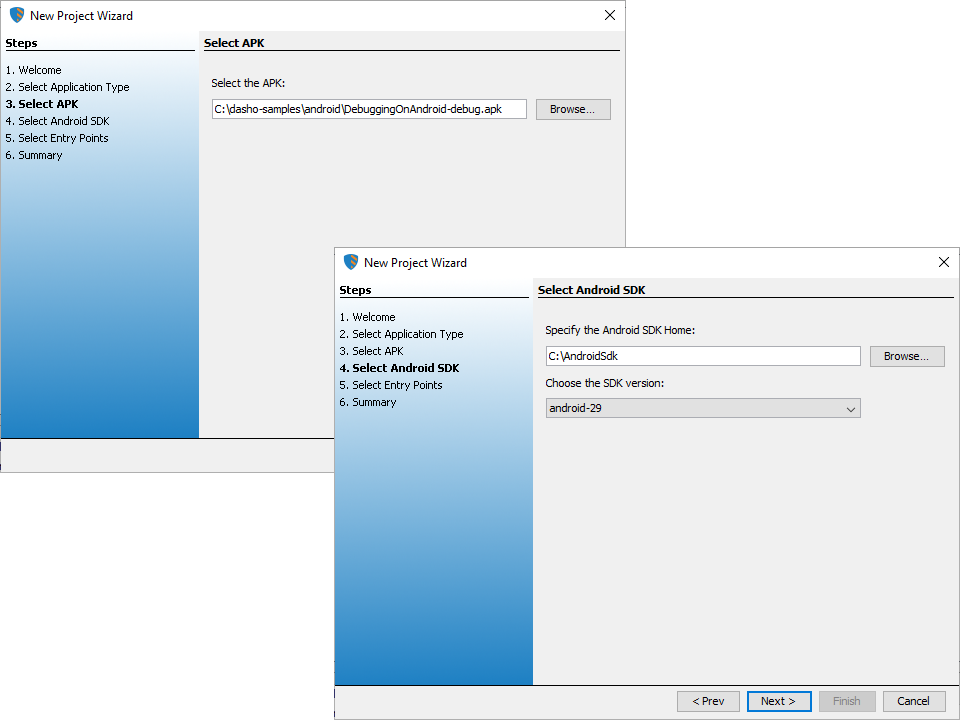
The wizard requires you to select a valid APK file.
The wizard will try to determine the Android SDK Home based on your environment. Select the SDK version used when the APK was created.

The wizard analyzes the AndroidManifest.xml, the resources, and the compiled classes inside the APK to determine the entry points of the application.
You may see some entry points that are not selected by default.
These are entry points that are usually used by non-Android applications.
Unless you know that some of the selections are incorrect, they should be left unmodified.
Note:
If the APK cannot be decoded properly you will see an error on the Select Entry Points page. Click Cancel and review output written to the Console for additional details.
The wizard will create a project.dox file.
This is the DashO project configuration file, and contains all the project-specific settings.
If a project file has already been created for this APK, DashO will ask if you want to replace the project. If you choose to save over the existing project, your new settings will be saved, and a backup of the old file will be created.
Additional Configuration
Some project details cannot be determined automatically and should be configured manually. This can be done from within DashO's User Interface.
You should:
Configure signing on the Output – Signing screen. If you do not configure signing, you will need to manually sign the obfuscated APK before it can be installed on a device or emulator. Please see http://developer.android.com/tools/publishing/app-signing.html for more information on signing APKs.
Configure or verify the configuration the Android Build Tools directory on the Output – APK screen.
Enable
Zipalign(uses the build tools) on Output – APK, in order to limit your app's memory footprint.
Additionally, it may be helpful to set the following properties on the Options - User Properties page:
ANDROID_BUILD_TOOLS_HOME– The location of the Android build tools you wish to use. This directory specified should contain thezipalignexecutable (e.g.c:\android-sdk\build-tools\27.0.3). If you are using build tools version prior to 19.1.0, this executable is not under thebuild-toolsdirectory but should be under thetoolsdirectory. The wizard tries to detect the Android SDK'sbuild-toolsdirectory to help with this configuration.APKTOOL_FRAMEWORK_DIR– A directory containing the framework file(s) to use with Apktool. This is only necessary in rare cases when the default framework file will not work (e.g. a custom device or an Android beta release). See http://ibotpeaches.github.io/Apktool/documentation/#frameworks for instructions regarding extracting the necessary framework.
APKTOOL_JRE– The Java home to use with Apktool. This must point to Java 8 or higher. (e.g.C:\Program Files\Java\jre1.8.0). This setting is optional if you are already running DashO with Java 8 (or higher) and it is on your system path.SKIP_APK_MANIFEST– This optional setting will enable skipping the processing of theAndroidManifest.xmlfile inside the APK. This can be set to “true” if none of the classes mentioned in the manifest are being renamed.
Note:
Copying theproject.doxfile from one machine to another should work as long as DashO and the Android SDK are available. You may need to updateANDROID_BUILD_TOOLS_HOMEto point to the new location of the Android SDK.
Integrate DashO into a Build
If you need to automate the obfuscation of the standalone APK, below are examples integrating with either a Gradle or an Ant build system. These use our DashO Gradle Plugins for Java and DashO Ant Plugin respectively.
Gradle Environment
You can invoke DashO from a Gradle build using the com.preemptive.dashoCustom plugin from the DashO Gradle Plugins for Java.
Note: This integration uses the DashO Gradle Plugins for Java, which are distinct from the DashO Gradle Plugin for Android.
Add the following to your build script:
buildscript {
    repositories {
        flatDir dirs: "{DashO Home}/gradle"
    }
    dependencies {
        classpath "com.preemptive:dasho:X.Y.+"
    }
}

apply plugin: 'com.preemptive.dashoCustom'

dashOConfig {
    dashOHome = '{DashO Home}'
    doxFilename = 'project.dox'
}

task obfuscate (type:DashOFileTask) {
    from("application.apk")  //Where application.apk is replaced by the actual filename and path
    to("application-ob.apk")
    addUserProperty("apkInput", '${gradleInput}')
    addUserProperty("apkOutput", '${gradleOutput}')
}
DashO Home will vary by platform. See the installation page for details.
To run, call gradlew obfuscate.
Notes:
Notice the single quotes around${gradleInput}and${gradleOutput}. Those literal strings need to be passed as property values.
Ant Environment
Call DashO from Ant by adding the following to your build script:
<typedef onerror="failall" resource="preemptive/dasho/anttask/antlib.xml"/>
<target name="obfuscate" description="Obfuscate the application.">
    <obfuscate project="project.dox">
        <sysproperty key="apkInput" value="application.apk" />
        <!-- Where application.apk is replaced by the actual filename and path -->
        <sysproperty key="apkOutput" value="application-ob.apk" />
    </obfuscate>
</target>
This will incorporate DashO's Ant plugin.
To run, call ant obfuscate.
It assumes you have installed DashO's Ant Task. Information on installing the Ant task is available in DashO's Ant Task documentation.
Install the Obfuscated APK
Once signed, the obfuscated APK can be installed using the standard Android tools:
adb install {filename}.apk
This will install the APK on a running emulator or connected device. You can then access the application by navigating to the applications list. The installed application will appear just like any other Android app installed on a device.